Basics
- Material App: A type of app in Flutter that follows the Material Design guidelines, which is a set of design principles and guidelines created by Google. A Material App uses a set of pre-defined widgets, icons, and colors that give the app a consistent look and feel across different devices and platforms. Material Design is focused on creating a visually appealing and intuitive user interface that is easy to use and navigate. Material Apps typically have a toolbar at the top, a drawer for navigation, and use various widgets such as buttons, cards, and lists to display content. Material Apps are a great way to quickly create a professional-looking app that follows industry-standard design guidelines.
- Widgets: Everything in Flutter is a widget, from the basic building blocks like text and buttons to more complex ones like layouts and animations.
- State: In Flutter, state refers to the data that can change over time and affect how the UI is rendered. There are two types of state: ephemeral state, which is local to a widget and only lasts as long as the widget is on screen, and app state, which is global to the entire app and can last across multiple screens.
- Stateless Widget: A type of widget that represents part of a UI that does not change dynamically based on user interaction or other external factors. A Stateless Widget is immutable, which means that once it is created, its properties cannot be changed. Stateless Widgets are commonly used to display static content, such as text, images, or icons. They are simple and efficient because they do not have to manage their own state, which can help improve the performance of the app. Since they are immutable, Stateless Widgets can be easily reused throughout an app, making it easier to create a consistent look and feel across multiple screens. Overall, Stateless Widgets are a key building block in Flutter that allow developers to create efficient and scalable apps
- Stateful Widget: A type of widget that represents part of a UI that can change dynamically based on user interaction or other external factors. A Stateful Widget maintains its own mutable state, which can be updated over time. For example, a button that changes color when it is pressed would be implemented as a Stateful Widget. Stateful Widgets are commonly used to manage user input, display dynamic content, and handle animations. When the state of a Stateful Widget changes, the Flutter framework rebuilds the widget, which updates its appearance on the screen. This makes Stateful Widgets a powerful tool for creating interactive and responsive user interfaces. However, because they manage their own state, Stateful Widgets can be more complex than Stateless Widgets and require more careful management to ensure that they function correctly. Overall, Stateful Widgets are a crucial part of Flutter that enable developers to create dynamic and engaging apps.
- Scaffold Widget: A pre-built widget that provides a basic framework for creating an app layout. It includes a standard app bar at the top of the screen, a floating action button at the bottom right, and a body area where other widgets can be placed. The Scaffold Widget is commonly used as the top-level widget in a Flutter app, providing a consistent and predictable user interface. The app bar provided by the Scaffold Widget can be customized with icons, titles, and other widgets, and can be used to navigate between screens, search for content, or display settings. The floating action button is typically used to trigger a primary action, such as creating a new item or submitting a form. The body area of the Scaffold Widget can contain any other widget or combination of widgets, such as text, images, lists, or forms. The Scaffold Widget is highly customizable and can be extended or modified to fit the specific needs of a particular app. Overall, the Scaffold Widget is a useful and flexible tool that makes it easy to create a basic app layout in Flutter.
- Layout: Flutter provides a rich set of layout widgets that allow you to position and size your UI elements in various ways, such as columns, rows, stacks, and more.
- Navigation: Flutter offers a powerful navigation system that allows you to move between different screens in your app using a variety of techniques, such as push and pop navigation, drawer navigation, and tab navigation.
- Themes: With Flutter, you can easily create a consistent look and feel for your app using themes. A theme defines the visual properties of your app, such as colors, fonts, and shapes, and can be applied globally to all widgets in your app.
- Animation: Flutter has a built-in animation framework that makes it easy to create complex animations and transitions. You can animate any property of any widget using various animation classes provided by the framework.
- Gestures: Flutter provides a set of gesture detectors that allow you to respond to user input, such as taps, swipes, and scrolls. You can use these detectors to create interactive UI elements like buttons, sliders, and more.
- Asynchronous programming: Flutter is designed to handle asynchronous programming with ease. It uses the async/await syntax to simplify working with asynchronous operations, such as fetching data from a server or performing a time-consuming task.
- Packages: Flutter has a rich ecosystem of packages that provide additional functionality to your app. You can easily add these packages to your app using the pubspec.yaml file, which manages dependencies.
- Hot reload: One of the most powerful features of Flutter is hot reload, which allows you to quickly make changes to your app's code and see the results instantly, without having to recompile and restart the app. This makes development much faster and more efficient.
Install Flutter on Windows
Steps to install Flutter SDK on Windows:
- First, download and install the latest version of the Flutter SDK for Windows from the official Flutter website https://flutter.dev/docs/get-started/install/windows.
- Once the download is complete, extract the zip file to a suitable location on your computer.
- Next, add the path to the Flutter SDK to your system environment variables. To do this, open the Control Panel, go to System and Security, then click on System. Click on Advanced System Settings, then click on Environment Variables. Under System Variables, click on New and add a new variable named "Flutter" with the value of the path to the Flutter SDK.
- Next, download and install the latest version of Android Studio from the official website (https://developer.android.com/studio/).
- Open Android Studio and click on the Configure menu, then select the SDK Manager. Under the SDK Platforms tab, make sure that Android 11 (R) is installed. Under the SDK Tools tab, make sure that Android SDK Build-Tools, Android Emulator, and Android SDK Platform-Tools are installed.
- After installing the necessary tools, open a terminal or command prompt and type "flutter doctor" to check if everything is set up correctly. If there are any issues, the "flutter doctor" command, explained bellow, will provide suggestions on how to fix them.
- Finally, you can start creating Flutter apps on Windows by using Android Studio or any other code editor that supports Flutter development.
In Flutter "flutter doctor" is a command-line tool that is used to diagnose and troubleshoot issues with your Flutter environment. Here are the steps to use "flutter doctor":
- 1. Open a terminal or command prompt on your computer.
- 2. Type "flutter doctor" and press enter. This will start the "flutter doctor" command, which will check your Flutter environment for any issues or missing dependencies.
- 3. The output of the "flutter doctor" command will show you the status of your Flutter installation, as well as any issues that need to be addressed. If everything is working correctly, the output will look like this:
Doctor summary (to see all details, run flutter doctor -v):
      [✓] Flutter (Channel stable, version 2.8.1, ...)
      [✓] Android toolchain - develop for Android devices (Android SDK version 31.0.0)
      [✓] Chrome - develop for the web
      [✓] Visual Studio - develop for Windows (Visual Studio Community 2019 16.11.5)
      [✓] Android Studio (version 2021.1)
      [✓] IntelliJ IDEA Community Edition (version 2021.2)
      [✓] VS Code (version 1.63.2)
[✓] Connected device (1 available)- 4. If there are any issues or missing dependencies, the "flutter doctor" command will provide suggestions on how to fix them. For example, if the command detects that the Android SDK is not installed, it will provide instructions on how to install it.
- 5. Once you have addressed any issues or missing dependencies, run "flutter doctor" again to ensure that everything is working correctly.
I present below the simplest flutter application:
//simple flutter app
import 'package:flutter/material.dart';

void main() {
  runApp(MyApp());
}

class MyApp extends StatelessWidget {
  Widget build(BuildContext context) {
    return MaterialApp(
      home: Text('Hello Hello'),
    );
  }
}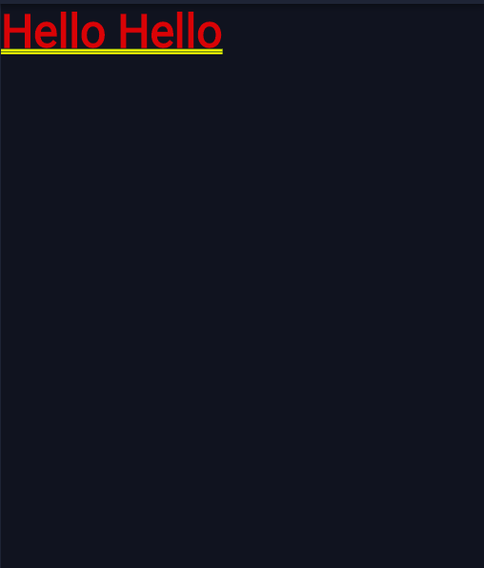
This is a simple Flutter app that displays a text message "Hello Hello" on the screen. The app is built using the Material Design framework, which provides a set of pre-designed widgets and components for building beautiful and responsive user interfaces.
The app code is written in the Dart programming language and consists of a main() function and a StatelessWidget class called MyApp. The main() function is the entry point of the app and calls the MyApp widget to run.
In general, any Flutter program starts by importing the Flutter package: import 'package:flutter/material.dart'; . Here, we imported the material.dart package. which represents Material Design, an Android-oriented design language created by Google. This package gives us the possibility of creating an Android-type visual user interface. Its components allow a reliable development working model to build Android applications according to Google specifications.
Next in the program we find the entry point of Flutter applications. This is the main() function which passes an object called MyApp as an argument the runApp function: runApp(MyApp()); . This has the effect of attaching the MyApp widget to the screen.
In the next lines we used a StatelessWidget widget for creating the UI, which doesn't maintain any state: class MyApp extends StatelessWidget . In this block, MyApp retuns a MaterialApp widget at the root level of the application and contains one important property named home. Home: It is the inner interface of the application, through which another widget, text type: Text('Hello Hello') is displayed on screen. The colon : signs that appear designate the use of named arguments.
The MyApp widget overrides the build() method, which is responsible for building the user interface of the app. In this case, the build() method returns a MaterialApp widget that sets the home property to a Text widget containing the message "Hello Hello". The MaterialApp widget also provides some basic configuration options for the app, such as the app title, theme, and other settings.
Overall, this simple app serves as a good starting point for learning Flutter app development, as it demonstrates how to build a basic user interface and use the Material Design framework.
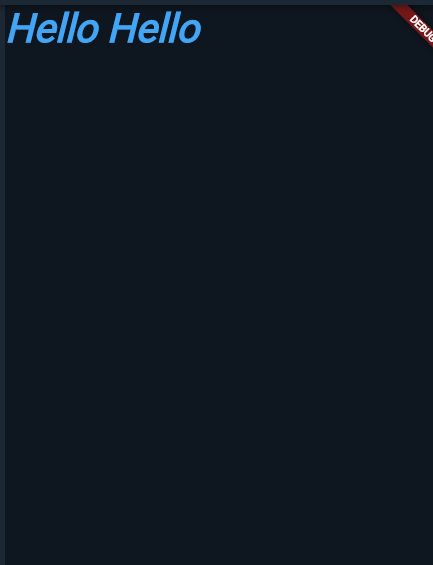
I have modified the application below adding text styles:
//adding text styles
    import 'package:flutter/material.dart';

    void main() {
      runApp(MyApp());
    }

    class MyApp extends StatelessWidget {
      @override
      Widget build(BuildContext context) {
        return MaterialApp(
          home: Text('Hello Hello',
              style: TextStyle(
                  fontSize: 40,
                  color: Colors.blue[400],
                  fontWeight: FontWeight.bold,
                  fontStyle: FontStyle.italic,
                  decoration: TextDecoration.none)),
        );
      }
    }
    home: Text('Hello Hello',
              style: TextStyle(
                  fontSize: 40,
                  color: Colors.blue[400],
                  fontWeight: FontWeight.bold,
                  fontStyle: FontStyle.italic,
                  decoration: TextDecoration.none)
                  ),
I present below another simple flutter application which contain a Scaffold widget with AppBarr :
//simple dart program

  import 'package:flutter/material.dart';

  void main() {
    runApp(MyApp());
  }

  class MyApp extends StatelessWidget {
    @override
    Widget build(BuildContext context) {
      return MaterialApp(
          home: Scaffold(
              appBar: AppBar(
        title: Text('App bar'),
      )));
    }
  }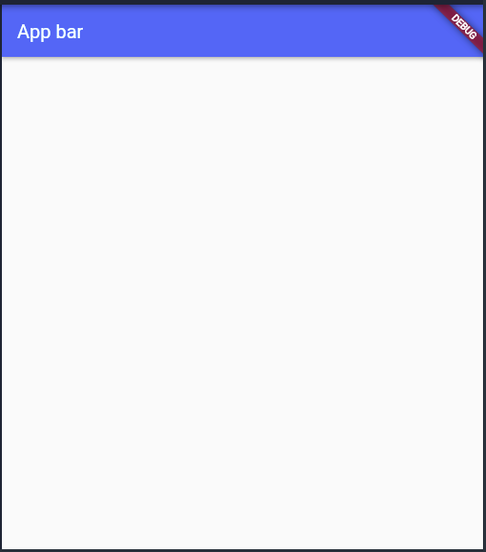
This is a simple Flutter program written in Dart language that displays an app bar on the screen. The program starts with the main() function that calls the MyApp() widget to run.
The MyApp widget is defined as a StatelessWidget and overrides the build() method to build the user interface. In this case, the build() method returns a MaterialApp widget that sets the home property to a Scaffold widget. The Scaffold widget is a basic container that provides the basic structure and functionality of the app, such as app bar, drawer, bottom navigation bar, etc.
Within the Scaffold widget, the program creates an AppBar widget with the title 'App bar'. The AppBar widget is the topmost widget that displays the title and any additional actions on the screen. It is typically used to provide navigation and actions for the app.
Overall, this program demonstrates how to create a basic app bar in Flutter using the Scaffold and AppBar widgets. With Flutter's flexible and customizable widgets, developers can create beautiful and functional user interfaces that meet the needs of their app.
I present below another simple flutter application which contain a Scaffold widget with AppBarr and body:
//simple dart program
  import 'package:flutter/material.dart';

  void main() {
    runApp(MyApp());
  }

  class MyApp extends StatelessWidget {
    @override
    Widget build(BuildContext context) {
      return MaterialApp(
        home: Scaffold(
          appBar: AppBar(
            title: Text('App screen'),
          ),
          body: Center(
            child: Text(
              "Hello world",
              style: TextStyle(
                color: Colors.blue,
                fontSize: 50.0,
              ),
            ),
          ),
        ),
      );
    }
  }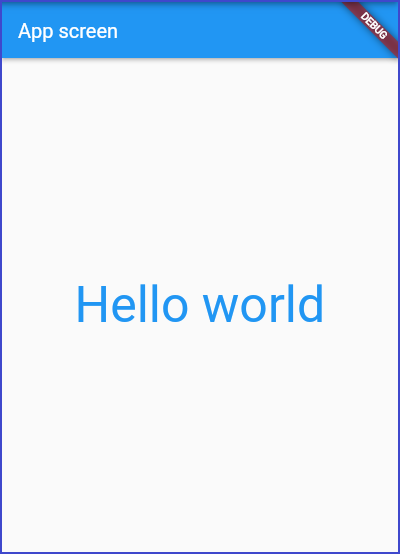
This is a basic Flutter app that displays a single screen with a centered "Hello world" text in blue color and font size of 50.
The app consists of a main function that runs the app, and a stateless widget MyApp that defines the app's UI using the MaterialApp widget.
Inside the MaterialApp widget, there is a Scaffold widget that defines the layout structure of the screen. It contains an AppBar widget with a title of "App screen" and a body that centers the "Hello world" text inside a Center widget.
The style property of the Text widget is used to set the text color to blue and the font size to 50.0. Overall, this is a simple example of how to create a basic Flutter app with a single screen.
Back to: Flutter index